
Technical Articles
Sakagami Seal Installation Instructions
Step-by-step installation method for Sakagami packings, ST/STK and SMJ seals, rotary joints, SDR/SCK/SCB/SDB wipers, S-LEEVE bearings and KCS/YCS/PCS cushion seals.
- Reading
- 9 min
- Updated
- 2026-08-13
- Published
- 2026-08-13
- Category
- Technical Articles
Sakagami packings, wipers, bearings and cushion seals are supplied for one-piece (continuous) grooves unless the drawing states otherwise. Almost every fitting problem on a hydraulic cylinder comes down to the same three causes: too much deformation, the wrong entry direction, or a sharp edge somewhere on the path. This page sets out the installation method profile family by profile family.
General rules
- Deburr and chamfer every edge the seal passes over; break the chamfer tip with a small radius.
- Grease the groove and the seal lightly with a fluid-compatible lubricant before fitting.
- Keep deformation to the minimum needed to get the seal over the shoulder, and hold it deformed for as short a time as possible.
- Never fit a seal with a screwdriver or any hard-edged tool. Use fingers, a plastic jig, or a mounting sleeve.
- Check the lip orientation before pushing home — a reversed U-packing or wiper will leak from the first stroke.
- Allow a recovery period after fitting where the profile has been heavily deformed, before pressurising.
1. Installing packings
1-1 U-packings and similar profiles
- Piston packings: hook one side of the packing into the groove, then extend the opposite side and push it over the piston shoulder into the groove.
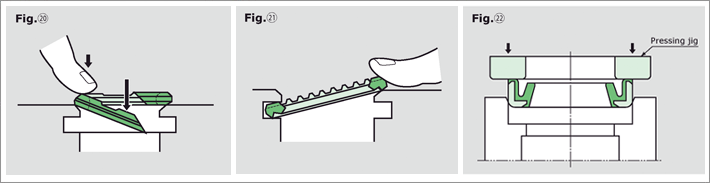
- Rod packings: deform the packing into an ellipse (kidney shape), slide one side into the groove and work the remainder in with the fingers from the opposite side.
- Small sections: use an installation jig rather than fingers — small-bore packings take permanent set very quickly when over-deformed.
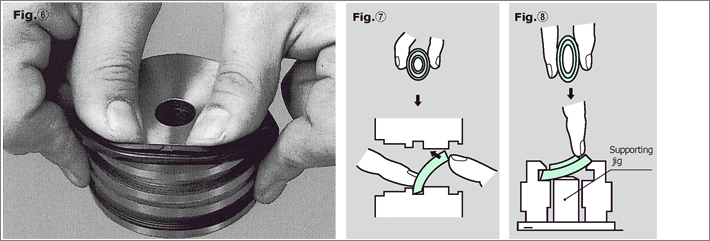
1-2 ST and STK seals
These are two-part sets: a PTFE-based slipper or seal ring energised by a rubber back ring.
- Fit the back ring (O-ring or square ring) into the groove first.
- Hook one side of the seal ring onto the groove.
- Push the opposite side in from the tapered side of the ring.
1-3 PG rings
- Piston: hook one side of the ring in and push the opposite side into the groove.
- Rod: deform the ring into a kidney shape, insert one side, then push the remainder home while holding the ring with the fingers.
1-4 SMJ seals
- Fit the rubber back ring (O-ring) first.
- Deform the seal ring into a kidney shape, insert one side and push the remainder home.
- Check the direction of the seal ring — SMJ seals are directional and will not seal if reversed.
- Minimise deformation of the seal ring throughout.
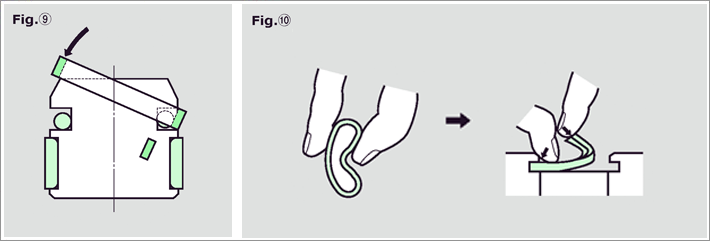
1-5 Rotary joints (STK / STR seals)
Multi-groove rotary joints are the hardest Sakagami installation, because each seal ring must travel past every groove and drain port above its own.
- Fit a single back ring (rubber square ring) into the lowest seal groove only.
- Move the seal ring down through the upper seal grooves and drain ports to its groove.
- Hook one side of the seal ring into the groove and push it quickly across to the opposite side, sliding it on the radiused or tapered section.
- Repeat for the second and subsequent grooves, working upwards.
- Never fit more than one back ring at a time — always install a seal ring and its back ring as a pair.
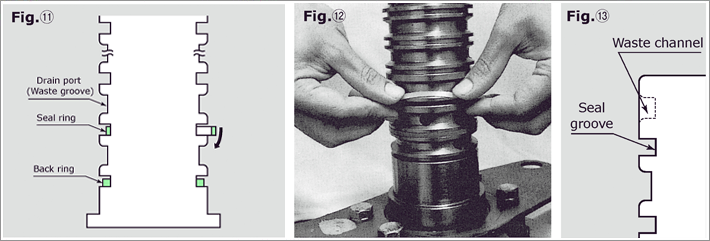
- At the design stage, radius the drain-port edges (R2–R3) and keep the groove pitch narrow so seal rings slide freely.
- Where the distance from the end face to the first groove is long, provide a waste channel to guide the seal ring.
- Set the drain-port depth in the same plane as the seal grooves so the ports themselves act as sliding channels.
2. Installing dust seals and wipers
| Type | Fitting method | Notes |
|---|---|---|
| SDR, SER, SFR | Snap-in, as a rod packing | Deform to an ellipse, fit one side, push remainder home |
| SCK | Snap-in, as a rod packing | Grease the groove interior generously; rust-protect the pressure-plate inner bore |
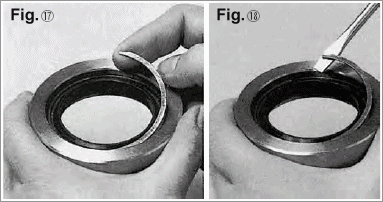
| SCB, SDB | Press-in with a jig | Press square — inclination during press-in distorts the metal case |
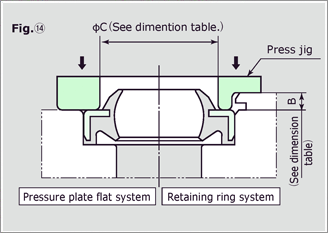
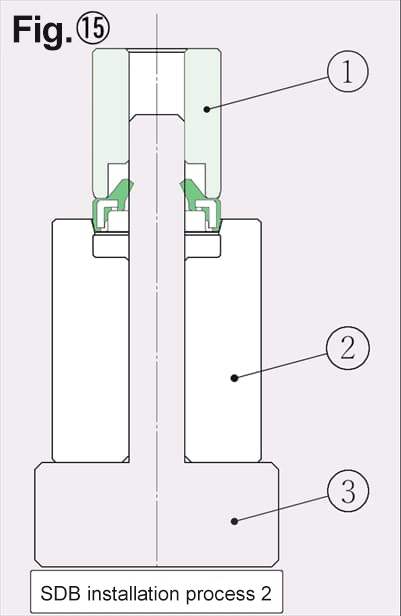
SDB press-in with inner peripheral guide
- Insert the SDB inner peripheral guide into the rod cover (housing).
- Fit the wiper onto the guide and push it gently into the rod cover.
- Place the pushing jig onto the guide.
- Press the jig home with a hand press.
- Remove the pushing jig, then the inner peripheral guide.
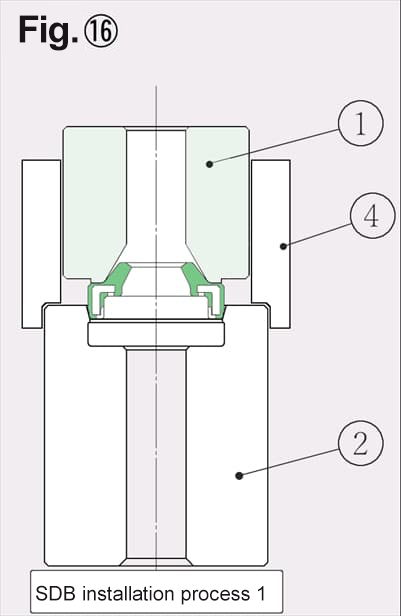
SDB press-in with pushing jig guide
- Push the wiper gently into the rod cover.
- Place the pushing jig and jig guide onto the shoulder of the wiper.
- Press home with a hand press.
- Remove the jig and guide.
3. Installing bearings and wear rings
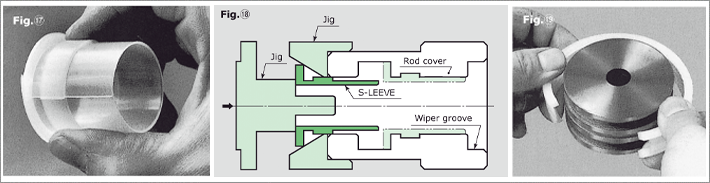
- Fit the S-LEEVE bearing before any packing or wiper.
- Rod S-LEEVEs above ø45 mm: deform by hand and insert from the dust-seal side.
- Rod S-LEEVEs ø40 mm and below: insert from the pressure side using a fitting jig.
- Piston S-LEEVEs and wear rings are cut at one point on the circumference — open the cut and spring them over the piston.
- Fit PWL bearings last, after all packings are mounted.
- Keep deformation to a minimum throughout; bearing strip does not recover like an elastomer.
4. Installing cushion seals
| Type | Method |
|---|---|
| KCS | Offset one end of the cut axially, hook it into the groove and push quickly around the circumference |
| YCS | Deform to an ellipse as for a rod packing, feed into the groove and push the last remaining section home with a finger |
| PCS | Press in with a jig, keeping the seal square to avoid inclination |
In all three cases, minimise deformation during fitting. Cushion seals run at high local velocity and any permanent distortion left from installation shows up as uneven cushioning at the end of stroke.
Post-installation checks
- Confirm every lip faces the pressure side and no seal is twisted in its groove.
- Rotate or stroke the assembly by hand before pressurising to confirm nothing is trapped.
- Commission at low pressure first; step up in stages rather than applying full working pressure immediately.
- Re-check for weeping after the first thermal cycle — installation damage often shows only once the seal has run warm.
Frequently asked questions
- Do Sakagami seals fit one-piece grooves?
- Yes — Sakagami products are designed for one-piece (continuous) grooves unless the drawing states otherwise. Where the housing makes one-piece fitting impractical, specify a split groove at the design stage.
- How do you install a Sakagami rod packing?
- Deform the packing into an ellipse or kidney shape, slide one side into the groove, then push the remainder in with your fingers from the opposite side. Use a fitting jig for small sections.
- In what order should bearings and packings be fitted?
- Fit the S-LEEVE bearing first, before any packing or wiper. PWL bearings are the exception — fit those last, after all packings are mounted.
- How are SCB and SDB wipers installed?
- They are pressed in with a jig, kept square to avoid inclination. Retaining rings are available for both types, which allow installation and removal without a special jig.
- How are STK seals fitted in a rotary joint?
- Fit one back ring at a time in the lowest groove, slide the seal ring down past the upper grooves and drain ports, then hook one side into the groove and push it quickly across the radiused or tapered section. Repeat working upwards.
Related articles
- Product FocusSakagami Profiles — Complete SummaryOne-page summary of every Sakagami Seisakusho seal profile: hydraulic, pneumatic, dust seals, wear rings and accessories with material, pressure, speed and temperature ratings.
- Product FocusSakagami NMY — NBR Rod Seals for Small Diameter Hydraulic CylindersCompact NBR rod seal for small-bore hydraulic cylinders. Rod sizes 3–30 mm, up to 21 MPa with backup ring, JIS B 2401 P-series gland dimensions.
- MaterialsSakagami Materials — Physical Properties ReferencePhysical properties of Sakagami NBR, HNBR, NBR blends, EPDM, FKM, S-KID and polyurethane compounds: hardness, tensile strength, elongation, temperature range and TR10 low-temperature data.
- Technical ArticlesChamfers, Lead-Ins and O-Ring Installation DamageLead-in chamfer angles and dimensions by O-ring section, assembly rules for threads and cross-drilled ports, and how to tell installation damage apart from genuine service failure.
Engineering enquiry
Need help specifying or replacing a seal?
Send dimensions, existing markings or a sample. Sealparts engineers respond in 1–3 working days.